This is the high time to get high-resolution images and videos and you always wanted more storage and space so that you can store your personal videos or images for a long time. Well, find Synology is the complete solution to your every storage-related problem. Every time you need to find Synology on your network, especially when you are setting up the network with your new Synology device. Sometimes, you might need the Synology NAS for its initial setup. However, it is one of the most popular storage devices on the market. For sure, they are really good at their work.
Thus, the Synology NAS Storage device ensures consistency, and the features are really well tested and established with top-notch software. Moreover, it also helps in making the process of running the server like getting a slice of a pie. Hence, the Synology NAS already showcases that seamlessly connects your home or the office network. In this article, you will find the different ways to find the Synology NAS network on your office or home network connection. Read on!
How to connect to find.Synology NAS Storage device?
Simply follow the underneath instructions carefully to run or open the access to the web port of the Synology NAS device.
- First and foremost, you should have a flat surface or a large table that is enough to position the Synology NAS so that you can establish the connection.
- Next, you have to place the storage device on a flat surface and fox the position.
- Now, you have to remove the front panel of the drive bay so that you will be able to see the settings inside the drive bay.
- Thereafter, safely slide out one of the drive bays and remove all the side panels.
After doing all the steps well, you have to slide the inner part of the hard drive which you will find on the bottom side of the hardware tray. Make sure that the SATA is facing the outward surface. - After placing the hard disk properly, safely remove the side clips and secure the drive tray of the hard drive.
- Repeat the same steps for each tray so as to add more hard drives.
- Before you begin the setup, you need to make sure that the drive tray of the NAS is placed properly and placed close and securely near the network.
The Synology NAS is helpful in providing great storage space and backup files. You can simply connect to the same network of the computer that the wifi router is using. So follow these steps to connect the Synology NAS to the network.
Smart Tactic to Find Synology on the network
The Synology NAS network is the smartest way to go for modern home selection. Plus, the Synology NAS provides a multifunctional server that perfectly connects to the network of your home or office. Moreover, it also allows you to stream your favorite shows or store important files by connecting to the same device on the same network. Thus, it also connects to the network of the router and then provides the whole-home safe internet connection. Smart home devices are also able to see the network of the Synology NAS such as smartphones, smart TVs, video gaming consoles, or desktop computers.
You can easily find Synology NAS on the network Via web assistant or Synology Assistant and it is the easiest way to do it. So check out the instructions below to find Synology NAS on your network seamlessly. Besides, this instructional guide also helps you to find the Synology network even when it disappears. Also here are the troubleshooting tips for your help as well.
Brief Instructions on finding the Synology NAS on a Network
It is already mentioned in the above para that there are two simple and easiest tools that help you to find the Synology NAS on your network. Either you can choose the Synology Web assistant or Synology Assistant. So here are the complete and fruitful instructions on finding the Synology NAS on a network.
Steps on finding the Synology on a network via Web Assistant
Follow the instructions carefully to find the Synology on the network.
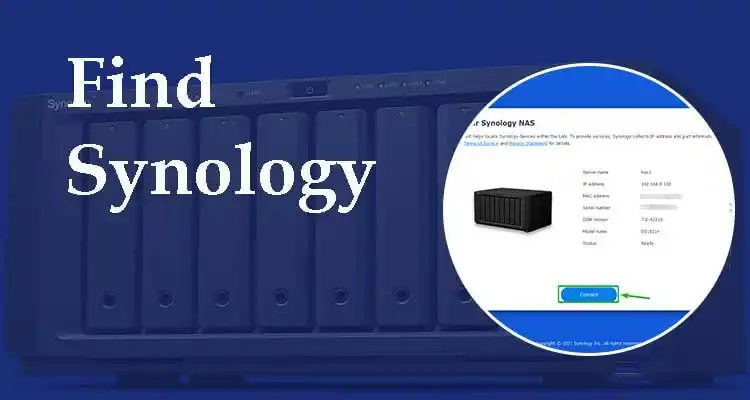
- First of all, go to the web browser and enter http://find.synology.com into the address bar.
- After that, tap on the connect button to access the Synology NAS network on another device.
- Thereafter, if you have numerous Synology NAS accounts running on the same network, then click on the arrow and navigate it from the left to the right corner of the page.
So all you have to do is to follow these three simple instructions carefully.
Easy setup instructions for Find Synology Assistant
As you know, the Synology assistant is an official app of the Synology desktop computer that also helps to search out the Synology network on different devices. Check out the instructions below to set up the Synology NAS storage device by using the Synology assistant.
- First of all, you need to go to the official website of Synology and install the Synology assistant app on your mobile device.
- After that, click on the drop-down button and simply select the product type.
- After that, click on the “NAS” option.
- Then you need to select the Synology product from the drop-down menu.
- Thereafter, simply enter the model number of the Synology product or you can also find it from the search result.
- Hereafter, simply scroll down and check the desktop utilities from the tab and find another Synology assistant for your help.
- Thereon, simply click on the access button to begin the installation of the Synology assistant.
- Afterward, go to the app of the Synology assistant and allow it to scan the available network in your area to safely catch the Synology device.
- In case, the scanning doesn’t work automatically then click on the search icon and go to the management section of the devices and click on it.
- Then the Synology devices will start appearing on your screen.
- Simply, select the Synology device of your network and click on it to begin the process.
This is how you can set up the find Synology through the Synology assistant on your network.
How to log in using Find Synology IP Address?
The Synology NAS storage devices are one of the finest and the most promising storage devices that is helpful in meeting the demands of its users. The system of the Synology NAS is very reliable and consistent and offers you a lot of smartness. Great features with a high-quality system. If you are setting up the Synology NAS device for the first time then you probably have some strange and not-so-weird questions. Also one of them is to find the IP address. For that, you have to complete the Find.synology.com login.
You are really lucky because we are here for your help, Synology made the login process easy and secure for every user. Just connect the Synology NAS device to your home network. The Synology desktop app and follow the in-depth instructions Via the IP address of your Synology NAS storage device.
- So first of all, jump to find.synology.com. For that, type the web address into the search bar of any web browser. The moment when you click on the enter button, the system will automatically start searching for the network and get access to the Synology NAS network.
- You can also use the web assistant for locating the Synology assistant on the network. On the same page, you can easily check all the important information about the Synology NAS model which also includes the IP address.
- Thereafter, connect the Synology NAS straight to the Synology to get the straight information from the dashboard. You can make the settings easier from the web browser.
These instructions will surely help you to find the Synology IP address.
I cannot find Synology NAS on network MAC? Resolve this issue
There are many certain reasons behind every problem, same with the Synology NAS storage device. You can simply check the steps that will help you to find out the causes and fix the problems of your Synology NAS assistant.
- First of all, you have to confirm the storage device services and the desktop computer settings and make sure that they are working on the same network and subnet.
- Thereafter, you need to disable the antivirus and the firewall software on a temporary basis on your windows device.
- Afterward, check and ensure that the Ethernet cables are securely connected to the Synology device and that none of them should be broken or faulty. If it is, then immediately replace it with the new one.
- Now move to the parts of the Synology NAS and make sure that there will not be any defective parts. To check the parts, you can start by connecting the Ethernet cable to another port of the device or you can also put it into other ports if Synology has multiple ports.
- Next, complete the installation of the Synology assistant on the desktop computer. You can also run the same application on another computer and search for the same Synology NAS device.
- You can also press the reset button on the Synology NAS device and wait for a while When you will hear a beep sound then release. The button and reconfigure the settings of the device.
- Closing down and disconnecting the drives from the Synology will help to retrieve the settings of the system and you can manage the settings after a while.
Try the above-mentioned steps to resolve the issues on the MAC network.
Why is Find.synology.com not working appropriately?
If the same problem is also happening to you then you have landed on the right article. Usually, this problem occurs with every second user of the Synology NAS storage device. Try to follow the following methods to check the actual issue and troubleshoot them immediately.
- Primarily, make sure that the computer and the Synology NAS are securely connected to the internet connection. Also, check and ensure that stable wifi with your smart router.
- After that, place the computer and the NAS device on the same network and the same subnet mask.
- If you are using the DSM then go to the DSM section and click on the control panel, then the info center. Thus, check the device analytics and then visit the share network location and manage the settings. Click on the checkbox to enable the Synology assistant.
- Thereafter, verify the settings of the network in case you have changed them. If you change the name of the server then you have to troubleshoot the location of the NAS and try the steps again. Re-enter http //Find.synology.com to continue the installation.
In case, none of the resolutions work then you can ask the Synology assistant or a technician to help you out.
Final words
In this article, we have shown you the two simple ways to set up the Synology NAS storage device via Synology Web assistant and the desktop app. We also have provided the steps so that you can easily find the information for the IP address of the Synology NAS storage device. In case of any problem, the troubleshooting guide is also there for your help. If any of the recommended suggestions don’t work then you can contact the team for further help or more information.